Thanks for visiting our help centre! Although we do not sell Avtex routers ourselves, a number of our customers use our SIMs in them, and so below is a guide on configuring your Avtex router to use our IQ Mobile SIMs!
Step 1
Insert the SIM into the slot marked SIM 1.
Step 2
Make a note of the following information on the back of your Avtex router:
WiFi SSID - This is the name of the Wi-Fi network and will be what you're looking for when connecting to the Wi-Fi from your devices such as your mobiles, tablets, laptops, smart speakers, satnavs and any device you're trying to use on the internet with this Wi-Fi device.
WiFi Password - Your devices cannot connect to the WiFi without the WiFi password, so please be careful who you give this information to as you should only allow trusted devices on your WiFi to preserve your data, privacy and data allowances. 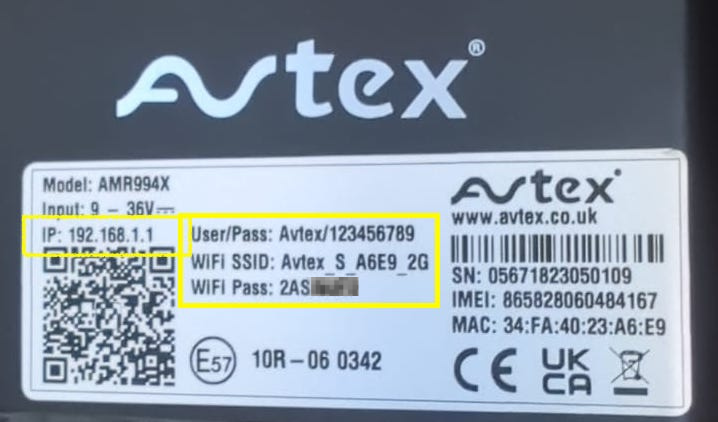
Step 3
The next step is to switch it on and connect to it's WiFi, This is an important step! Many people try to configure these devices without connecting to it's Wi-Fi.
Example, here we have used an iPhone, but the process is similar on Android and other mobile devices.
Settings ---> Wi-Fi ---> [Your WiFi SSID]
Enter the WiFi Password when prompted, then press the Join button.
Connecting to the Wi-Fi network shouldn't take more than 1 minute.
NOTE: You can do this step from any device: Phones, tablets or Laptops. We actually prefer doing it from a laptop as the screen is bigger and gives slightly easier control. For the rest of this guide we will be doing it via a laptop.
Connecting to the Wi-Fi on a laptop looks like this. It's almost identical to the mobile process above i.e Go to the WiFi menu, look for the WiFi SSID, select it and put in the WiFi Password, then click Join. Once completed you will be connected to the Avtex’s WiFi Network/Signal possibly without internet connection.
The next steps do not require an internet connection, however you must be connected to the router before continuing.
Step 4
Accessing the interface to check or enter the settings. From here on out we are doing this on a laptop as the screen is larger and a little more functional. But you can do this from a phone if you don't have a laptop accessible.
Go to a web browser, it doesn't matter if you are using Safari, Chrome, Firefox or Edge any web browser should be fine. It is imperative you are connected to it's WiFi, this page will not be reachable or accessible if you're on your home WiFi connection.
Enter http://192.168.1.1 in the address bar along the top of the web browser, and search
You’ll be met with a Login page. The username and password is as follows (make sure to use the admin password when making changes):
Username: admin
Admin Password: 987654321
Read-Only Password: 123456789
Step 5
A dashboard page should appear. On the right, select Interface > Link Manager > Link Settings
Then, next to WWAN1, selected the notepad and pen icon on the far right to edit the APN

You should now see the following page:

Use the following settings for IQ Go SIMs, and leave anything not specified as the default value, or as a blank field:
APN: everywhere
Username: eesecure
Password: secure
Authentication Type: Auto
If you are using an IQ Connect SIM, use the following settings instead:
APN: globaldata
Authentication Type: Auto
Press Submit, and then press Submit at the bottom of the page that appears.